Building Package Installers
/ 5 min read
This post was originally posted on Laravel News
I think most of us that have worked with Laravel for a while are very familiar with the package installation process: add the package via composer, register the service provider, publish the config file, update the environment file, hopefully you remember to update .env.example, and after all of that you hope that you didn’t miss a step. This often involved copying and pasting from a README and bouncing back and forth between your editor and a browser. With the release of Laravel 5.5 we got pretty great improvement to this process with package discovery but outside of that this experience hasn’t really changed much.
At the time that I had started building the Honeybadger integration for Laravel I had almost never seen install commands for PHP packages. The only one that came to mind was Laravel Spark. When we started outlining features for the integration, Josh suggested building an installation command similar to what they have in their Ruby gem. I thought this was a really neat idea that would make the installation process much smoother.
I had some very specific goals for adding this feature
- Visibility of all tasks performed (success and failures)
- Avoid as much manual work as possible
- Use command prompts for any required information
- Compatible with Laravel and Lumen
Visibility
I really didn’t want this installer to just go off into the background, modify a bunch of your files, and just come back with a message that everything was successful. I also didn’t want the output to be super verbose.
I came across a great package by Nuno Maduro nunomaduro/laravel-console-task. I really loved the simple API and the beautiful output. However, there were some issues getting this to work with Lumen so I put together a simple class to gather task names and result statuses.
namespace Honeybadger\HoneybadgerLaravel;
use Illuminate\Console\OutputStyle;
class CommandTasks{    /**     * @var \Illuminate\Console\OutputStyle     */    protected $output;
    /**     * @var array     */    protected $results = [];
    /**     * Set command output.     *     * @param  \Illuminate\Console\OutputStyle  $output     * @return self     */    public function setOutput(OutputStyle $output) : self    {        $this->output = $output;
        return $this;    }
    /**     * Add task with result to the stack.     *     * @param  string  $name     * @param  bool  $result     * @return self     */    public function addTask(string $name, bool $result) : self    {        $this->results[$name] = $result;
        return $this;    }
    /**     * Send results to the command output.     *     * @return void     */    public function outputResults() : void    {        collect($this->results)->each(function ($result, $description) {            $this->output->writeLn(vsprintf('%s: %s', [                $description,                $result ? '<fg=green>✔</>' : '<fg=red>✘</>',            ]));        });    }
    /**     * Get the results of all tasks.     *     * @return array     */    public function getResults() : array    {        return $this->results;    }}
This maintains a simple API and nice output
$this->tasks->addTask( 'Write HONEYBADGER_API_KEY to .env', $this->installer->writeConfig( ['HONEYBADGER_API_KEY' => $this->config['api_key']], base_path('.env') ));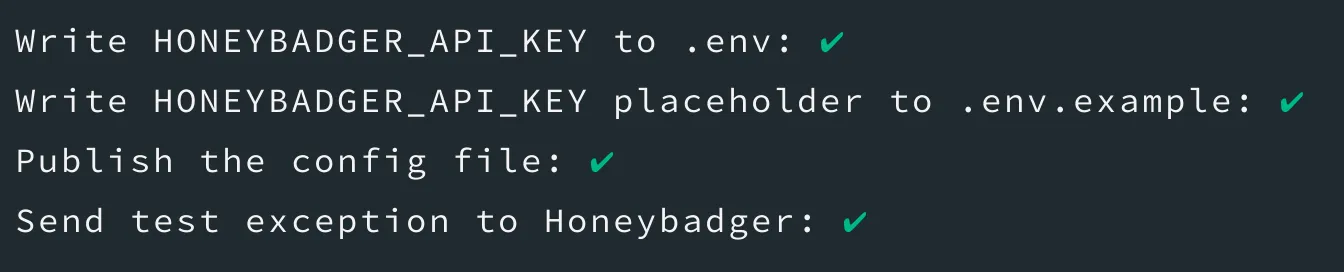
Avoiding Manual Work
The whole point of using an installer is to make the installation process fast, easy, and enjoyable. I’ve found one of the biggest pain points with installing new packages is updating both the .env file AND the .env.example file.
I ended up putting together a very lightweight package to accomplish this sixlive/dotenv-editor.
public function writeConfig(array $config, string $filePath) : bool{ try { $env = new DotenvEditor; $env->load($filePath); } catch (InvalidArgumentException $e) { return false; } collect($config)->each(function ($value, $key) use ($env) { $env->set($key, $value); }); return $env->save();}We can then use that method to write to both environment files. We’ll write a blank value to the .env.example file and we’ll write the API that we collected through command input to the .env file
private function writeEnv() : void{ $this->tasks->addTask( 'Write HONEYBADGER_API_KEY to .env', $this->installer->writeConfig( ['HONEYBADGER_API_KEY' => $this->config['api_key']], base_path('.env') ) ); $this->tasks->addTask( 'Write HONEYBADGER_API_KEY placeholder to .env.example', $this->installer->writeConfig( ['HONEYBADGER_API_KEY' => ''], base_path('.env.example') ) );}I also wanted to publish the configuration files for both Laravel and Lumen. With Laravel it’s pretty easy, you can invoke the vendor:publish command.
public function publishLaravelConfig() : bool{ return Artisan::call('vendor:publish', [ '--provider' => HoneybadgerServiceProvider::class, ]) === 0;}Lumen proves to be a little tricky because it lacks a lot of commands the come with Laravel.
public function publishLumenConfig(string $stubPath = null): bool{ if (! is_dir(base_path('config'))) { mkdir(base_path('config')); } return copy( $stubPath ?? __DIR__.'/../config/honeybadger.php', base_path('config/honeybadger.php') );}After we have all the configuration in place we’ll want to send a test exception over to Honeybadger. We do this to ensure that all of the configuration and installation steps worked correctly.

Prompting for Configuration Values
The first thing we do before performing any of the install tasks we want to gather all of the configuration values so we can do all of the installation in one swift move.
public function handle(){    $this->config = $this->gatherConfig();}
private function gatherConfig() : array{    return [        'api_key' => $this->argument('apiKey') ?? $this->promptForApiKey(),        'send_test' => $this->confirm('Would you like to send a test exception now?', true),    ];}
private function promptForApiKey() : string{    return $this->requiredSecret('Your API key', 'The API key is required');}
Laravel makes it really easy to just prompt for all of our configuration values directly into an associative array. This makes it super easy to reference these values across the command.
One thing I needed that was to make sure that the API key was required. I put together a pretty simple method to keep prompting for the API until it is entered.
trait RequiredInput{ public function requiredSecret($question, $failedMessage) { $input = $this->secret($question); if (is_null($input)) { $this->error($failedMessage); return $this->requiredSecret($question, $failedMessage); } return $input; }}Wrapping it up
The team at Honeybadger really strive to provide a smooth, polished, enjoyable experience from end to end which I think pairs perfectly with some of Laravel’s core principals. I think by using an installer for the package it brings that experience from their app to your terminal. We’re putting the finial touches on the installer and it will be making its way into the honeybadger-io/honeybadger-laravel library soon. You can keep an eye on the pull request here honeybadger-io/honeybadger-laravel/#11. In the interim, Honeybadger is still super easy to get up and running.